Are you ready to tap into the immense potential of selling on Amazon? Creating an Amazon Seller Account is your gateway to a thriving online business. Whether you’re an entrepreneur or an established brand looking to expand your reach, this step-by-step guide will walk you through the process of creating an Amazon Seller Account. By leveraging the power of this e-commerce giant, you can connect with millions of potential customers worldwide. So, let’s dive in and explore the essential steps to create your very own Amazon Seller Account.
Can you explain the process of Amazon seller registration step-by-step?
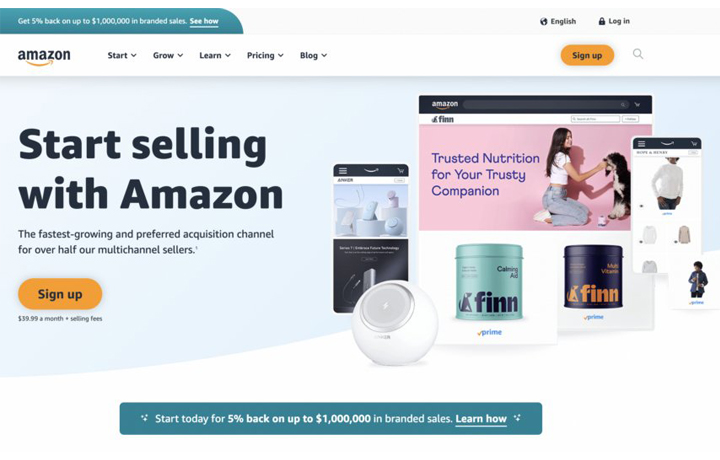
Step 1: Visit the Amazon Seller Central Platform
Open your web browser and go to the Amazon Seller Central website (sellercentral.amazon.com).
Click on the “Sign up” button to begin the registration process.
Step 2: Click on the Pricing Tab.
Before you embark on the process of creating your Amazon seller account, it’s essential to evaluate the available selling plans. To do so, navigate to the “Pricing” tab on the Amazon Seller Central website.
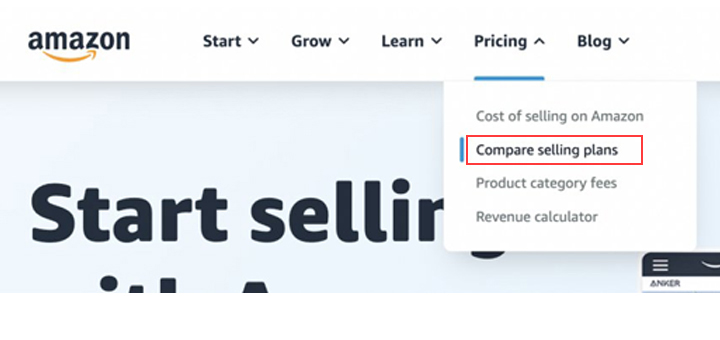
Look for the option to “Compare selling plans” and click on it. Accessing the comparison page will give you valuable insights into the distinctions between an individual and a professional seller account.
Step 3: Choose Between an Individual or Professional Seller Account.
When it comes to Amazon seller plans, you have two options: individual and professional.
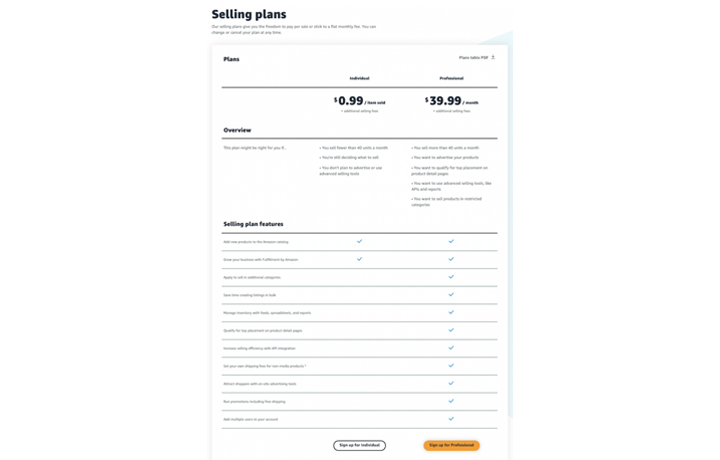
If you plan to sell on a smaller scale (less than 40 units per month), the individual plan is suitable. Keep in mind that it limits your access to the Buy Box and advertising options. Therefore, we will look into the professional seller for this particular blog post.
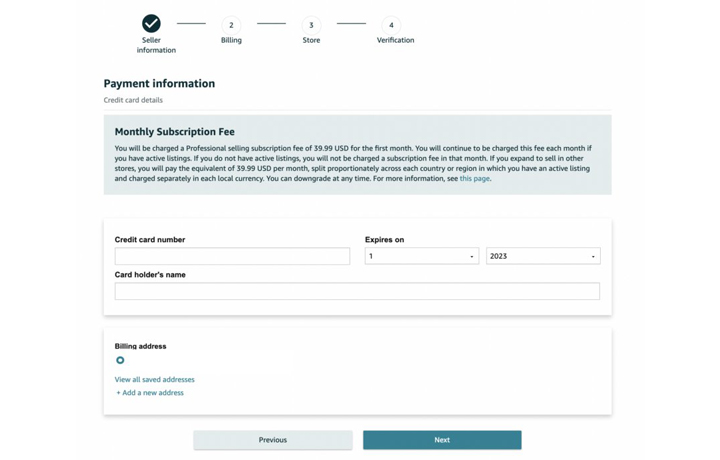
With the professional plan, there is a monthly fee of $39.99 that will be charged immediately after setting up your account. However, if your listings do not become active in the following months, you will not be subjected to this charge. although, once your listings are activated, the fee will be applied again.
The professional account is recommended for sellers expecting to sell more than 40 products per month. It saves you money and offers additional features.
Consider your sales volume and goals to make the right choice for your Amazon business.
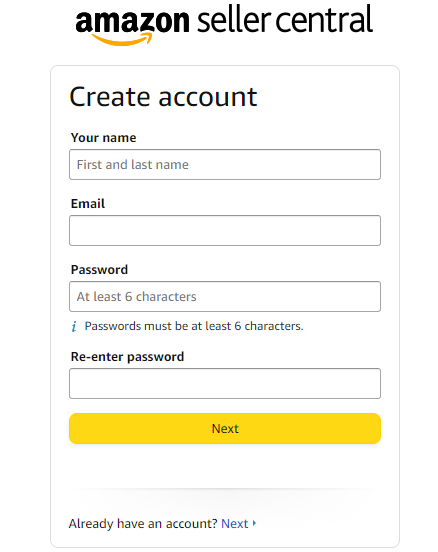
Step 4: Enter Your Email and Select ‘Create a New Account.
After selecting the professional seller plan, a window will prompt you to enter your email address and create a password for your seller account. Choose a password of your choice that meets Amazon’s security requirements.
Once you have entered your email and password, click the ‘Next’ button to proceed.
The next screen will inform you that a verification code has been sent to the email address you provided. This is Amazon’s standard procedure to verify the email.
Once you enter the verification code in the designated field, you will automatically be redirected to the following screen:
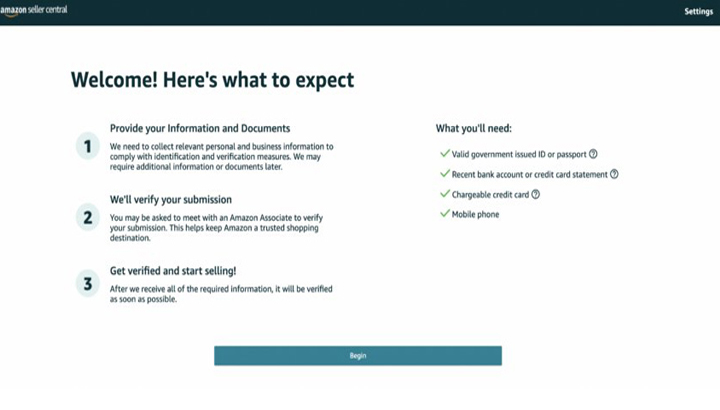
Amazon will provide you with a list of requirements to complete your registration:
- Valid Government-issued ID or passport.
- Recent bank account or credit card statement.
- Chargeable credit card.
- Mobile phone for anytime verification.
Step 5: Select Your ‘Business location’ and ‘Business type’
In this step of the Amazon seller registration process, you will provide the following information:
Business location: Specify the country where your business is physically located. Accuracy is crucial, as Amazon will verify this information during the registration process.
Business type: Choose the appropriate business entity from the provided options. Most sellers fall into the ‘Privately-owned’ category, but the available choices are:
- State-owned business
- Publicly-owned business
- Privately-owned business
- Charity
- None, I am an individual
If your business is not yet formally established, select “None, I am an individual.” In this case, Amazon will require your full name in the subsequent step.
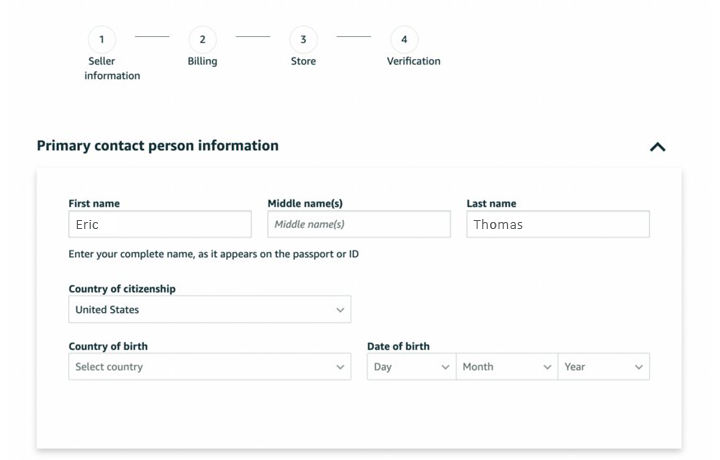
Your full name: Make sure you enter your first, middle, and last name.
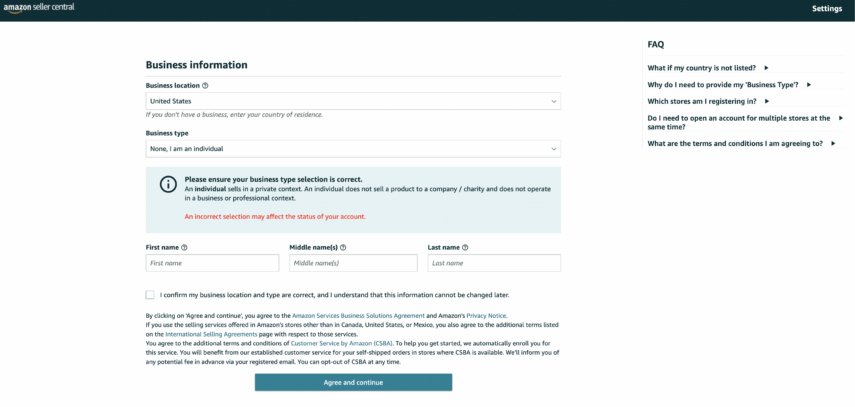
Then, click the ‘Agree and continue’ button.
Step 6: Enter Your Personal Information.
In this step, you will be required to provide the document details you prepared in step-4 to Amazon. This includes providing a valid form of identification, such as your passport number or driver’s license number.
In order to continue, it is necessary to verify your phone number. You have two options for verification: either request a PIN via text message or via phone call. After receiving the PIN through text message or call, enter it to verify your phone number.
It is crucial to ensure that all the information you provide is accurate and up-to-date before proceeding to the next step. Double-checking your details will help avoid any potential issues during the registration process.
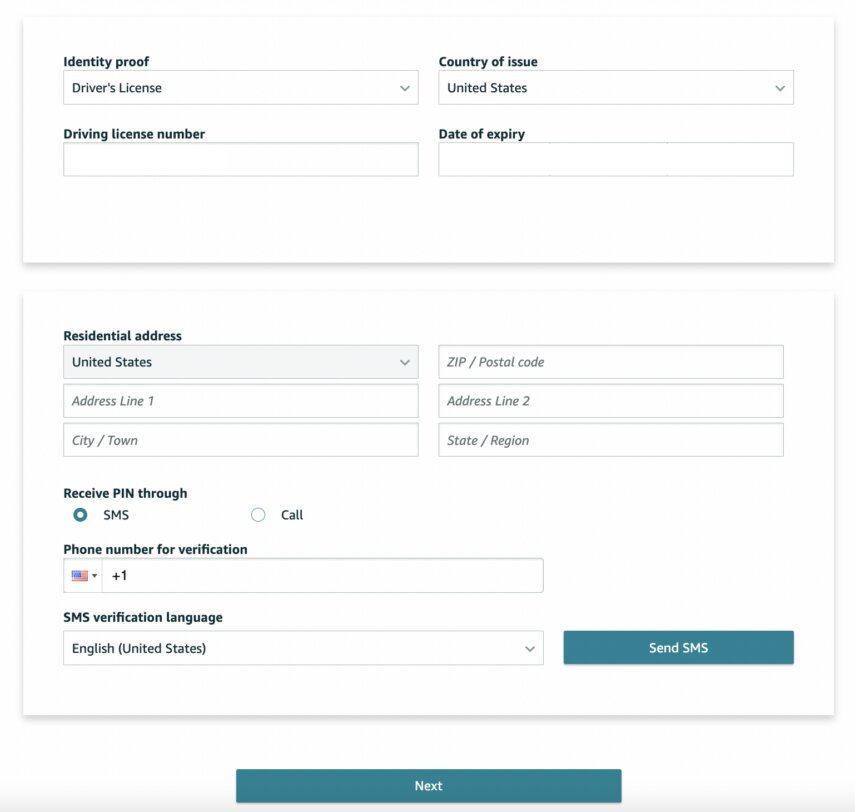
Once you have entered all the required information, locate the ‘Next’ button located at the bottom of the screen and click on it to proceed.
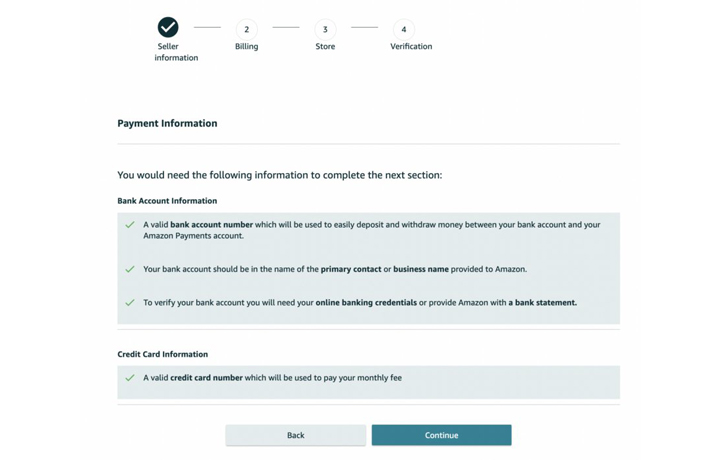
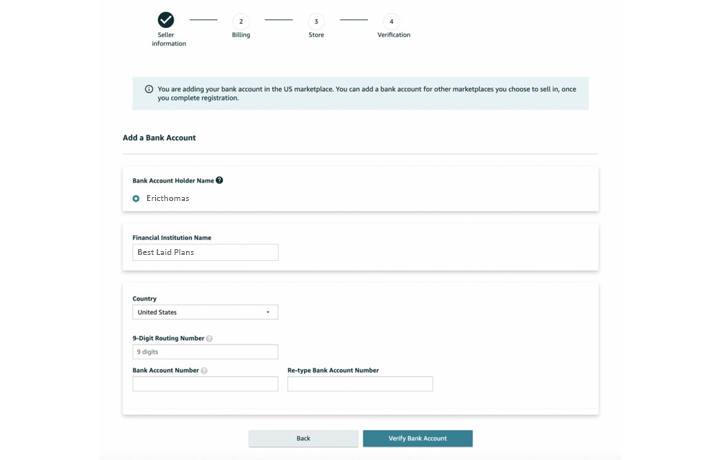
Step 7: Provide Your Billing Information.
In this step, you will need to give Amazon your billing details. This includes providing a valid bank account number and a valid credit card number.
Ensure that the bank account and credit card information you provide is accurate and up-to-date. This information will be used for transactions, fees, and any financial activities related to your Amazon seller account.
Step 8: Add Amazon Store and Product(s) Information.
Once you have provided credit card information and it’s been validated, you will proceed to provide details about your Amazon store and the products you intend to sell.
To progress to the next stage of the Amazon seller registration process, you will need to answer the following questions:
The name of your Amazon store: Don’t worry too much about this at this stage, as you can always change it in the future.
Availability of UPC codes for your product(s): Indicate whether you possess UPC codes for your products. If you are uncertain, it is advisable to select “Yes.”
Diversity certifications: Specify if you have any diversity certifications for your business.
Manufacturer and/or brand ownership: Confirm whether you are the manufacturer and/or brand owner of the products you intend to sell.
If you select ‘Yes’ or ‘Some of them’ for brand ownership, you will be asked an additional question: “Do you own a government-registered trademark for the branded products you want to sell on Amazon?”
Provide accurate information and answer these questions accordingly. This will help Amazon understand your store and product details, ensuring compliance with their guidelines and policies.
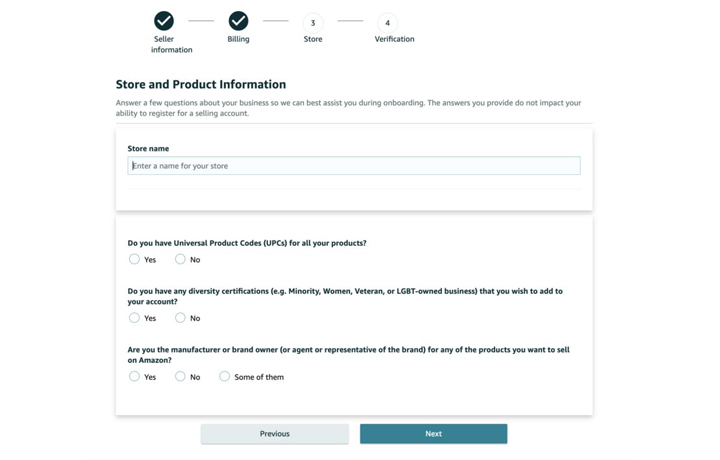
After providing your answers to the above-mentioned questions, click the ‘Next’ button to continue with the registration process.
Also Read: 7 Amazon Product Research Tactics to Find Profitable Products
Step 9: Identity Verification.
In the next step, you will be required to verify your identity by uploading scanned or digital images of your identification document (such as a driver’s license or passport) and a bank statement.
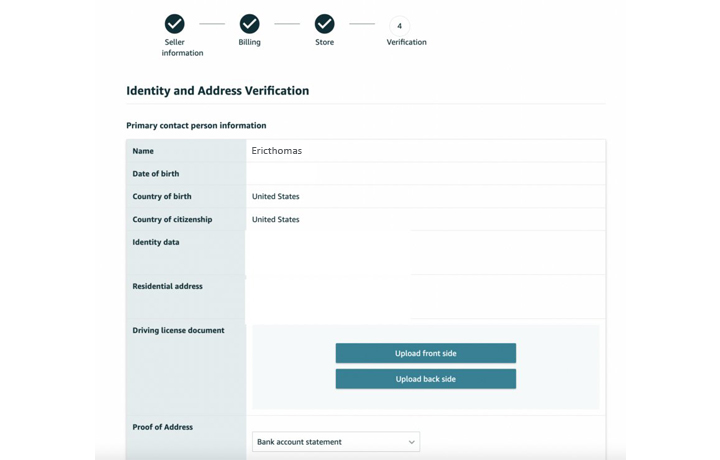
Once you have uploaded the necessary documents, click the ‘Submit’ button to proceed.
After submitting your documents, you will be scheduled for an Identity verification process through a video call with an Amazon associate. This step is crucial for Amazon to confirm the authenticity of your provided documents and personal information.
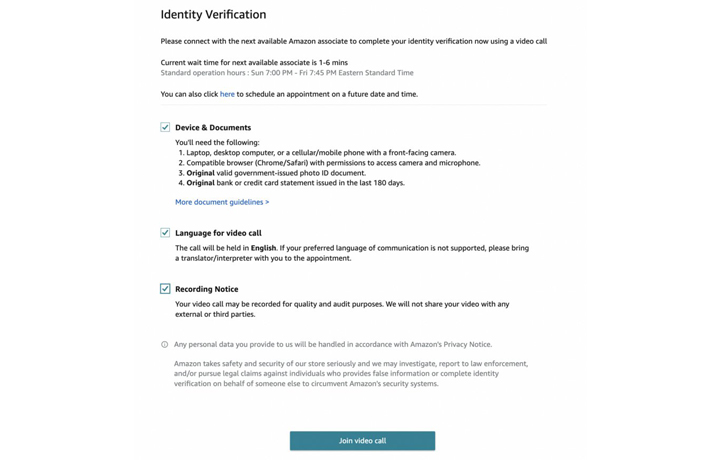
During the video call, the associate will verify the details you provided and ensure compliance with Amazon’s policies and guidelines. This additional verification step strengthens the security and integrity of the Amazon seller platform.
Once your identity is verified, you will gain access to your seller account. The seller account home screen will provide an overview of your account’s performance and important metrics. It is a centralized hub for managing your product listings, orders, and overall seller performance. Take time to familiarize yourself with the features and tools available on the home screen to optimize your Amazon business.
Conclusion
In 2026, Amazon continues to grow with a 12% Y-o-Y increase in sales making $716.9 billion in 2025. To tap into this thriving marketplace and build a successful business, the first step is to complete the Amazon seller account sign-up process. By registering as an Amazon seller, you gain access to a vast customer base and a range of powerful tools and resources to drive your e-commerce venture forward. Understanding the fees involved is also crucial, as it allows you to make informed decisions and effectively manage your costs. By following the steps outlined in this article for Amazon seller account sign-up, you’ll be well on your way to seizing the opportunities presented by Amazon and establishing a thriving e-commerce business. So don’t miss out on the chance to join the Amazon marketplace through the Amazon seller account sign-up process and unlock the potential for success in the e-commerce landscape of 2026.
If you find the process of setting up an Amazon seller account daunting or time-consuming, the SPCTEK team is here to help. We offer a complimentary service to handle your Amazon seller account setup. Our experienced team will guide you through the registration process, ensure all necessary information is accurately provided, and answer any questions you may have along the way.
By taking advantage of our free Amazon seller account setup service, you can save time and streamline the process, allowing you to focus on other aspects of your e-commerce business.